This post considers SSH (Secure Shell) and using it on Xubuntu. Additionally, I’ll cover using Sysstat to monitor your system.
I’m using my HP EliteBook 2570p as a local computer and I’m running Xubuntu 16.04.3. This is an assignment for a Linux server course taught by Tero Karvinen.
Installing and configuring SSH, enabling UFW firewall
Installing SSH on Xubuntu is very simple. Just open the terminal and type “sudo apt-get install ssh“. This installs the protocol on your machine.
If you’re configuring a new server for example, it’s a good idea to enable Xubuntu’s firewall, UFW (Uncomplicated FireWall,) as the next step. The firewall is a front-end for iptables and it’s foremost meaning is to be simple to use.
NOTE! Before enabling UFW, if you’re setting up a remote machine, be sure to allow traffic through the port you’re using to keep the connection open. If you’re using SSH, the port you need to keep open by default is port 22. This can be done with the command “sudo ufw allow 22/tcp“. If you intend to use other ports as well, be sure to keep them open as well.
To enable UFW, use the command “sudo ufw enable“. That’s it, short and simple.
File transferring with SSH
If you want to transfer or move files using SSH, you can use SCP, Secure Copy. I covered this in my previous post, but here’s a quote:
Next I needed to transfer a web page created on my local computer to my virtual server. There’s an easy method for this and it’s called SCP, standing for Secure Copy. SCP uses SSH to transfer files between two locations. I had written a PHP site on my local machine so I decided to transfer it. To do this, I navigated to the folder holding the file and typed:
“sudo scp index.php oliver@oliverlahti.me:/home /oliver“
After I gave the command I had to log into my server with the user “oliver” but that’s basically it. SCP in very convenient and secure to use so use it often!
Automating SSH logins
Logging on to a remote machine with SSH is quite simple, but can be very taxing after a while, especially if you need to access the machine constantly. However, there is an easy method to automate your login in a safe manner. This can be accomplished by generating a pair of private and public keys. SSH can generate keys with different algorithms but uses RSA by default. To generate a key pair, use the following command:
“ssh-keygen“
After generating the pair, use the command “ssh-copy-id username@domain” to copy the public key to your remote machine. Replace username and domain with the login address. You need to type in your password when prompted, but the next time you login, it should happen automatically without a need for password typing.
Sysstat installation and monitoring
If you have need for system performance tools, you should take a look at Sysstat (System statistics). Sysstat is a collection of performance tools that have several features. Here’s the full list from debian.org:
– sar: collects and reports system activity information
– iostat: reports CPU utilization and disk I/O statistics
– mpstat: reports global and per-processor statistics
– pidstat: reports statistics for Linux tasks (processes)
– sadf: displays data collected by sar in various formats
– cifsiostat: reports I/O statistics for CIFS filesystems
– nfsiostat-sysstat: (obsolete) reports I/O statistics for network filesystems
To install Sysstat, all you need is to type “sudo apt-get -y install sysstat“. To enable information gathering, type “sudoedit /etc/default/sysstat” and change the value at the end of the file from “false” to “true”. After changing the value you need to restart Sysstat with the command “sudo systemctl start sysstat“. You can now check that Sysstat works by using the “sar” command. I let Sysstat run for a day on my virtual server and here are the sar results:
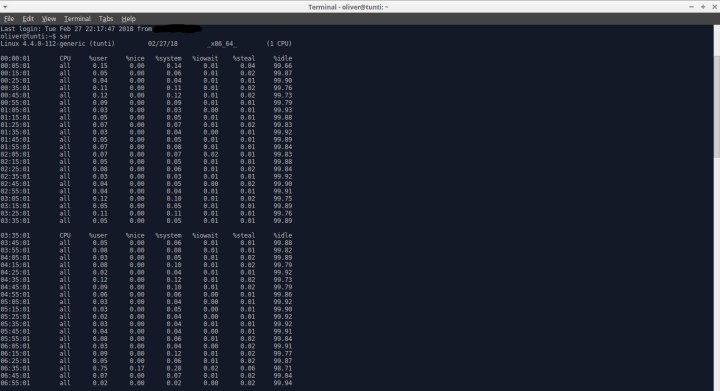

Linux 4.4.0-112-generic = states the kernel version
(tunti) = computer name
02/27/18 = date of examination
_x86_64_ = states the CPU architechture
(1 CPU) = number of CPU cores
00:00:01 = timestamp
CPU = states the used core
%user = this shows the total resources that the processor is spending on different user processes
%nice = this shows the resources spent by the CPU for processes that have changed nice values
%system = this shows the percentage of resources spent by the processor for operating system tasks
%iowait = specifies the amount of time the CPU spends waiting for I/O requests to complete
%steal = the idle time spent by a virtualized CPU when waiting for resources from the physical machine
%idle = states the CPU idle time
Next, I tried the command “iostat“:
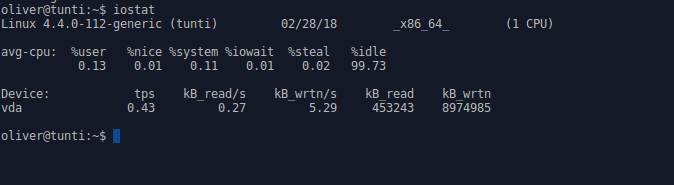
This command reports CPU utilization and disk I/O statistics.
Device = states the disk type
tps = Transactions Per Second
kB_read/s = kilobytes read per second
kB_wrtn/s = kilobytes written per second
kB_read = kilobytes read (in total)
kB_wrtn = kilobytes written (in total)
Lastly, I tried the command “pidstat“:
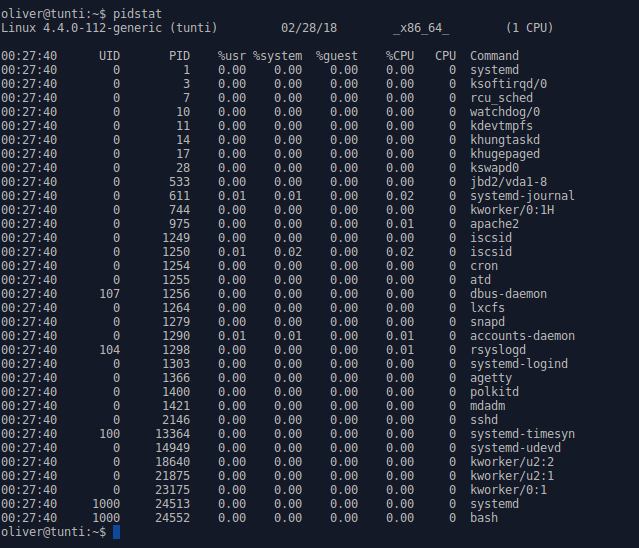
UID = User Identifier, states the process initiator
PID = Process Identifier, identification number for the process
CPU = CPU dedicated to the process
Command = name of the process
Sources
http://terokarvinen.com/2017/aikataulu-%E2%80%93-linux-palvelimet-ict4tn021-7-ti-ja-6-to-alkukevat-2018-5-op – The course I’m attending
https://fi.wikipedia.org/wiki/SSH – Info on SSH
https://www.digitalocean.com/community/tutorials/how-to-setup-a-firewall-with-ufw-on-an-ubuntu-and-debian-cloud-server – Info on UFW
https://packages.debian.org/jessie/sysstat – Sysstat info
https://unix.stackexchange.com/questions/274855/understand-sar-command-output-unix – Sysstat sar info
https://katrilaulajainen.wordpress.com/2018/02/27/linux-h5-15-2-2018/ – Sysstat info
https://lahdemi.wordpress.com/2018/02/27/5-kotitehtava/ – Sysstat info
