This time I’m taking a look at how to use Apache on your own virtual server. I’ve already set up my own virtual server with Digital Ocean, but you can use any other service as well, there are loads of them. Be sure to compare the pricing and reviews when choosing your host!
As per usual I’m using my HP EliteBook 2570p as a local computer and SSH to connect to my virtual server hosted by Digital Ocean. I’m running Xubuntu 16.04.3 locally and Ubuntu 16.04.3 on my virtual server (1GB RAM).
This is an assignment for a Linux server course taught by Tero Karvinen.
Configuring a basic user and home folder access for Apache
Once you’ve setup your virtual server, it’s time to create a basic user. I needed to set up a new user as well as grant access for Apache to the user’s home folder. Thankfully creating new users is easy, just type “sudo adduser username” after you’ve connected to your virtual server. The user is immediately created and you get to choose a password as well as add several other optional pieces of information to your user. ALWAYS CHOOSE A STRONG PASSWORD! The web is full of automated bots trying to access vulnerable servers, so be sure to make it hard for them by securing your server.
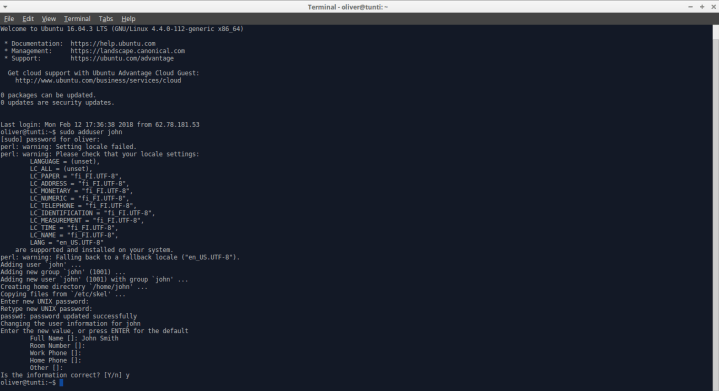
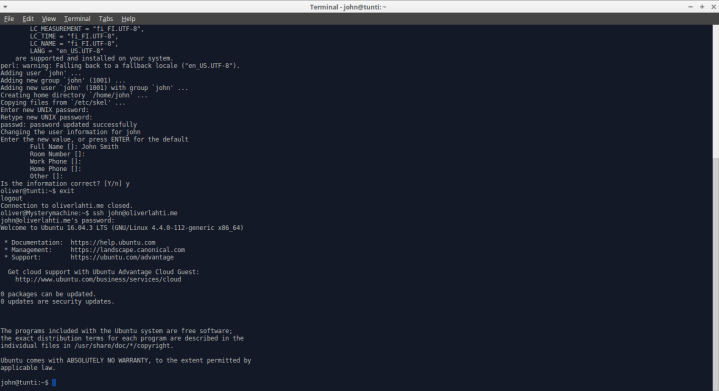
If you don’t want to fill in some of the additional information, you can just leave it empty and type enter. After creating your new user, be sure to test that it works. For example, I created a user named “john”, so now I could use the command “ssh john@mydomain” or “ssh john@myIPaddress” to connect.
Now to add access for Apache that’s installed on the server. I’m quoting my previous post on how to do this, be sure to check it out if you want a more in depth look on how to open user directories for Apache!
Next we’ll open up the user directories for Apache so it can scan your home folder and display pages from it. To do this, type “sudo a2enmod userdir” to your terminal. After this we need to restart Apache by typing “sudo systemctl restart apache2.service“.
Now that Apache can access your home folder we should make a web page. You should start by making a new folder inside your home folder. You can do this via the terminal with the command “mkdir public_html” (make directory). If you are not sure how to navigate to the home folder in the terminal, be sure to check my previous post. You can create the folder with the GUI.
After accessing your new folder, create a new HTML file. You can do this with the terminal by typing in “nano index.html“. This will allow you to create a HTML file that will be placed into your working directory. Here’s the basic code for a HTML site:
<!DOCTYPE html>
<html><head>
<title>Place the title here!</title>
</head>
<body>
<p>Add text here!</p>
</body>
</html>
After you’ve written your page you can close the editor and save by pressing ctrl + x. You should now have a working web page in your public_html folder that the Apache software can access.
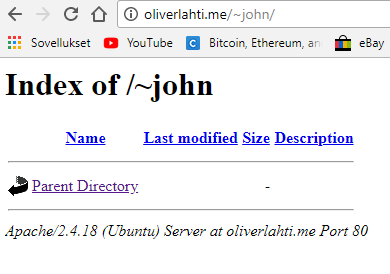
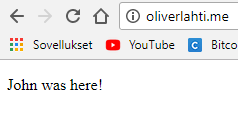
Remember to test your site! Here’s what the user folder should look like in a browser when you don’t have a HTML file in it yet:
Changing Apache’s root path
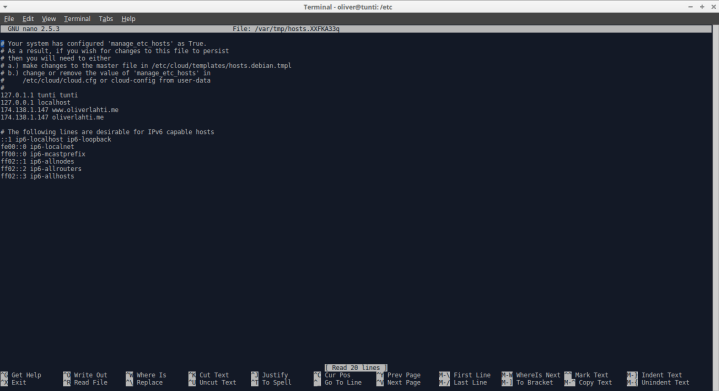
Now that you have permitted access to user directories and made your first web page, you can make the newly created folder under your new user the default path for Apache so that the page in the folder will be displayed at your domain. To change Apache’s default path you need to change a few things. I’ll use my own settings here as an example, you can also check out Janne Varis’s excellent and compact guide. I wanted to create a new folder for my site under the previously created public_html so while logged as my sudo user on my virtual server via SSH I typed “cd /home/john/public_html” and created a new folder with “mkdir oliverlahti.me“, named after my domain.
After you know which folder you want to use, go to the path “cd /etc/apache2/sites-available” and add a new configuration file by typing “sudoedit yourdomain.conf“. Type in the following:
<VirtualHost *:80>ServerName www.yourdomainServerAlias yourdomainDocumentRoot /home/user/public_html/yourdomain</VirtualHost>
Monitoring possible break-in attempts
Now that we an Apache server running on a virtual server machine, it would be interesting to know if we’re attracting any unwanted visitors to our server. This is easy with one command, “sudo tail -f /var/log/auth.log“. This opens up the authentication log which let’s you see all the attempts to connect to your server:
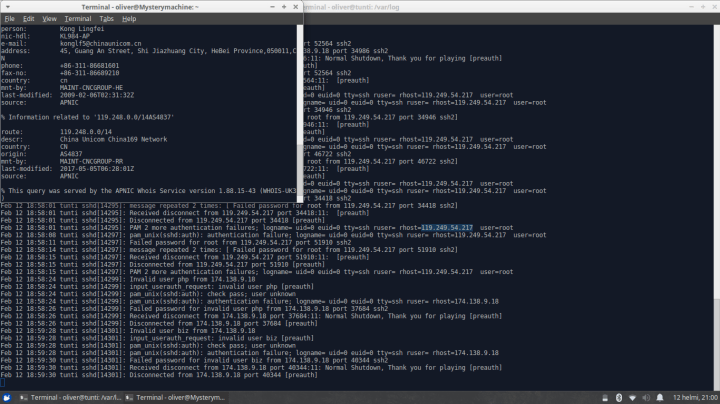
Here you can see a part of my log. There were constant attempts to access my server as a root user from IP addresses unknown to me. I found this quite interesting so I decided to investigate one of these addresses. I decided to use “whois“, which can find out information about IP address registrations. You can install it with “sudo apt-get install whois“. Just type “whois theipaddress“and you’ll get the info. The IP I tried lead to China and returned quite a bit of information, among it a name, e-mail address and phone number. I’m not sure if this is actually valid information or just a diversion but at least it’s interesting.
Public servers are constantly under stress from automated SSH break-in attempts. This is why you should always secure your users with strong (read long and complex) passwords. In addition there are other ways to protect your server. If you haven’t already done so, you should definitely enable the firewall that comes in by default in Ubuntu (it’s called ufw, UncomplicatedFireWall and it’s built on iptables). Make sure to leave port 22 open for SSH before you enable the firewall though, otherwise you might get locked out. You should also lock your root account and make a new user with the same permissions. Most break-in attempts are targeted at the root user so even the worst brute force attack at root won’t leave you open if you’ve disabled the user in question.
All of these important steps are instructed here at my teacher’s site, I really recommend you perform these actions.
Using SCP to transfer files from a local host to a remote one
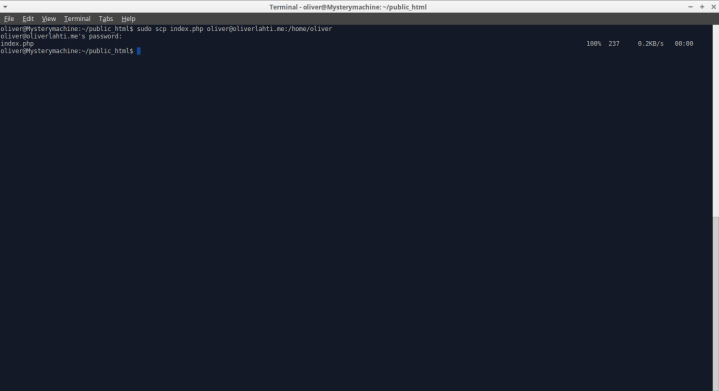
Next I needed to transfer a web page created on my local computer to my virtual server. There’s an easy method for this and it’s called SCP, standing for Secure Copy. SCP uses SSH to transfer files between two locations. I had written a PHP site on my local machine so I decided to transfer it. To do this, I navigated to the folder holding the file and typed:
“sudo scp index.php oliver@oliverlahti.me:/home /oliver“
After I gave the command I had to log into my server with the user “oliver” but that’s basically it. SCP in very convenient and secure to use so use it often!
Adding a PHP site to your virtual server Apache
Finally, I had to enable my virtual server’s Apache to accept PHP files and use one as the default page at my domain. In my previous post I already instructed how to enable PHP usage in Apache so I’ll just post a quote here:
In order to get PHP to work with Apache we need to install a module for Apache. You can use the following command “sudo apt-get install php libapache2-mod-php“. Be sure to restart the server afterwards with “sudo systemctl restart apache2.service”. Now that we’ve installed the module, we still need to enable PHP usage, since it’s disabled by default. To edit the correct configuration file, type the command “sudoedit /etc/apache2/mods-available/php7.0.conf“. You need to add the “#” symbol in front of ALL the bottom lines to make them into comments. This way you can run PHP in user directories a.k.a the home folder. Remember to save the changes to the file with ctrl+x. Finally, restart Apache again with “sudo systemctl restart apache2.service”.
After you’ve enabled using PHP, you can write some PHP and place it in your Apache’s root path that we set earlier. Here’s an example of my site, it prints the visitor’s IP address (actually quite handy):
<!doctype html>
<html>
<head>
<meta charset =”utf8″>
<title>Check your IP</title>
</head>
<body>
<p>Hi, here you can see your IP address!</p>
<br>
<p>Here’s your IP: </p><?php echo $_SERVER[‘SERVER_ADDR’]?>
</body>
</html>
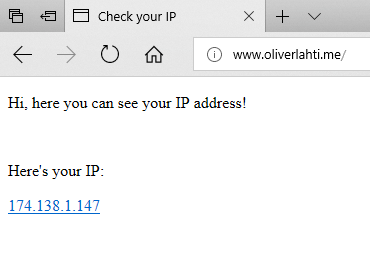
Feel free to use it. This was in the file I transferred with SCP. I now moved the file with “sudo mv index.php /home/john/public_html/oliverlahti.me” to the folder that was my root path for Apache. I got the results I wanted, Apache now displays this page as default when accessing my domain:
This was a quick look at some of the things you can configure on your virtual server. I definitely encourage you to explore more, I’m sure I will!
Sources:
http://terokarvinen.com/ – the course I’m attending as well as additional instructions
https://jvaris.wordpress.com/2014/03/03/linux-server-task-5-apache-name-based-virtual-hosting/ – Janne Varis’s site for Apache default path editing
http://www.hypexr.org/linux_scp_help.php – SCP commands
https://wiki.ubuntu.com/UncomplicatedFirewall – Information on ufw

One thought on “Basic virtual server configuration”