Today I’m taking a quick look at Apache, the world’s most popular server software. As usual I’m running Xubuntu 16.04.3 on an HP EliteBook 2570p. This post is an assignment for a course I’m attending, taught by Tero Karvinen.
Installing Apache
In order to get started with Apache we need to install it. If you’re not sure if you already have Apache installed and running, you can type “localhost” or 127.0.0.1 to your browser. If you’re not directed to the Apache default page, you know you don’t have Apache running.

To install Apache, open up the terminal emulator and type in the command “sudo apt-get update” and afterwards “sudo apt-get install apache2“. When prompted for a permission to use storage space type yes or just y.
After the installation is complete, you can try typing the formerly mentioned addresses to your browser (“localhost” or 127.0.0.1). You should now see the default page!
Next we’ll open up the user directories for Apache so it can scan your home folder and display pages from it. To do this, type “sudo a2enmod userdir” to your terminal. After this we need to restart Apache by typing “sudo systemctl restart apache2.service“.
Now that Apache can access your home folder we should make a web page. You should start by making a new folder inside your home folder. You can do this via the terminal with the command “mkdir public_html” (make directory). If you are not sure how to navigate to the home folder in the terminal, be sure to check my previous post. You can create the folder with the GUI.
After accessing your new folder, create a new HTML file. You can do this with the terminal by typing in “nano index.html“. This will allow you to create a HTML file that will be placed into your working directory. Here’s the basic code for a HTML site:
<!DOCTYPE html>
<html>
<head>
<title>Place the title here!</title>
</head>
<body>
<p>Add text here!</p>
</body>
</html>
After you’ve written your page you can close the editor and save by pressing ctrl + x. You should now have a working webpage in your public_html folder that the Apache software can access. To test it out, you can try typing “localhost/~username” into your web browser. You should be seeing your new site:

You can even access this new site from a different computer in your local area network! Just type in your IP address (you can find this by typing “ip addr” into the terminal) and add the same path /~username to the end.

Monitoring the Apache access log
To access Apache’s access log, you should head to the log folder. By default it’s /var/log/apache2/. By typing the command “sudo tail -f /var/log/apache2/access.log” you can open the access log and monitor it in real-time. Now it’s time to make some entries:

An example of a successful action, the web page gets served correctly to the client. Here’s the full entry:
My IP address – – [07/Feb/2018:01:25:37 +0200] “GET /~oliver/ HTTP/1.1” 200 478 “-” “Mozilla/5.0 (Linux; Android 7.0; SM-G955F Build/NRD90M) AppleWebKit/537.36 (KHTML, like Gecko) Chrome/64.0.3282.137 Mobile Safari/537.36”
My IP address – This displays the client’s IP address (I’m accessing the server from my phone)
[07/Feb/2018:01:25:37 +0200] – Date and timezone, both correct
“GET /~oliver/ HTTP/1.1” – States the used method, requested resource and the used protocol
200 478 – 200 is the status code for a successful transaction and 478 stands for the size of the sent resource
“Mozilla/5.0 (Linux; Android 7.0; SM-G955F Build/NRD90M) AppleWebKit/537.36 (KHTML, like Gecko) Chrome/64.0.3282.137 Mobile Safari/537.36” – Information about the client browser and device build
And here’s the example of a failed action in which the client has tried to access an unknown location:

Here’s the full entry:
My IP address – – [07/Feb/2018:01:27:36 +0200] “GET /~olive HTTP/1.1” 404 500 “-” “Mozilla/5.0 (Linux; Android 7.0; SM-G955F Build/NRD90M) AppleWebKit/537.36 (KHTML, like Gecko) Chrome/64.0.3282.137 Mobile Safari/537.36”
These lines are almost the same as before, except for the status code 404, which stands for “resource not found”. I tried to access the nonexistent resource “olive” instead of “oliver”, which resulted in the error.
Causing an error with PHP
In order to get PHP to work with Apache we need to install a module for Apache. You can use the following command “sudo apt-get install php libapache2-mod-php“. Be sure to restart the server afterwards with “sudo systemctl restart apache2.service”. Now that we’ve installed the module, we still need to enable PHP usage, since it’s disabled by default. To edit the correct configuration file, type the command “sudoedit /etc/apache2/mods-available/php7.0.conf“. You need to add the “#” symbol in front of ALL the bottom lines to make them into comments. This way you can run PHP in user directories a.k.a the home folder. Remember to save the changes to the file with ctrl+x. Finally, restart Apache again with “sudo systemctl restart apache2.service”.
I decided to edit my previously created HTML file by adding a line of PHP. You can do this via the GUI or the terminal by navigating to your public_html folder and typing “nano index.html“. Here’s an example code:
<!doctype html>
<html>
<head>
<meta charset =”utf8″>
<title>My site</title>
</head>
<body>
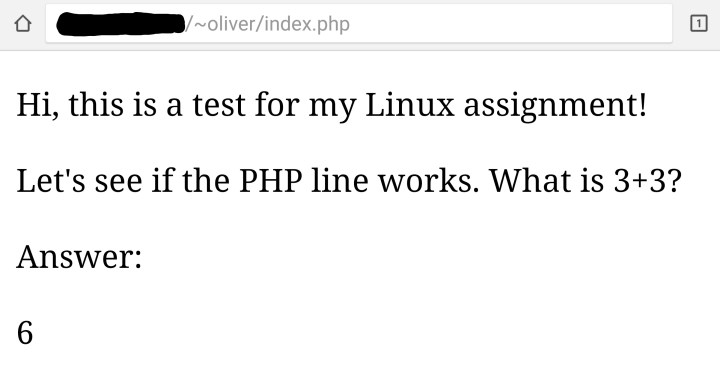
<p>Hi, this is a test for my Linux assignment!</p>
<p>Let’s see if the PHP line works. What is 3+3?</p>
<p>Answer: </p>
<?php print(3+3)?>
</body>
</html>
After you’re done editing, be sure to rename the file as “index.php“. I tried the page on my phone, works perfect!
Now to cause an error. I modified the PHP line by removing the last question mark. This is what followed:

The page isn’t loading at all! Now we can check Apache’s error log. To access it, we can type “sudo tail /var/log/apache2/error.log” This is the error entry I received:
[Wed Feb 07 03:45:11.735912 2018] [:error] [pid 17160] [client My IP-address:56816] PHP Parse error: syntax error, unexpected ‘<‘ in /home/oliver/public_html/index.php on line 11
Here we can see that the problem is caused by the syntax error we placed in the file.
Causing an error entry to an Apache configuration file
Here my goal was to cause an error to Apache’s process by altering a configuration file. I decided to see all the possible files by typing in “cd /etc/apache2” and “ls“. I wanted to modify “apache2.conf” since it sounded important. I wasn’t exactly sure how to cause an error so I went with the easy way; I removed everything!

After deleting everything I saved the file and restarted the Apache process. That’s when I got this:
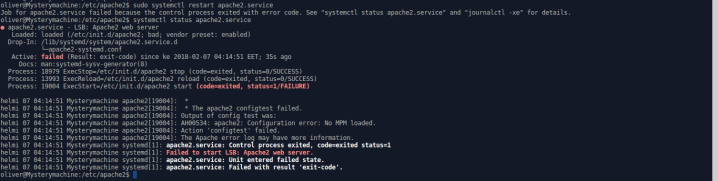
As you can see, Apache wouldn’t start correctly. This was because “The apache2 configtest failed”. I also tried to access my web site but of course I was rejected.
So, don’t empty your configuration files, unless you want screw up your settings. Glad I took backups!
Various HTTP status codes
During this assignment I encountered various different HTTP status codes:
200 – Successful action. This occurred every time I successfully loaded a web page.
403 – Forbidden action. I got this one when I tried to access my home folder via Apache without the user directory module.
404 – Not found. Got this when I tried to access a nonexistent location.
Sources:
http://terokarvinen.com/2017/aikataulu-%E2%80%93-linux-palvelimet-ict4tn021-7-ti-ja-6-to-alkukevat-2018-5-op – The course I’m attending
https://en.wikipedia.org/wiki/Apache_HTTP_Server – General info on Apache
https://httpstatuses.com/ – Info on HTTP status codes
https://httpd.apache.org/docs/2.4/logs.html – For Apache log interpretation

3 thoughts on “Installing, testing and running Apache”